

How to release music independently: A practical guide to launching your track
Dropping music on your own is way more than just hitting "upload" and hoping for the best. It’s a full-on project, and if you treat it like one, you’ll see results. A solid timeline is probably the most powerful tool you have. Without it, you’re just guessing, and you'll inevitably miss critical deadlines and promotional windows that could have made all the difference.
Your Independent Release: The Essential 12-Week Timeline
Think of this 12-week plan as your playbook. It breaks down a pretty overwhelming process into simple, week-by-week tasks. Starting 12 weeks out gives you the breathing room you need to get everything lined up, from the technical stuff like mastering and distribution to the creative marketing that actually builds hype. This isn't just a checklist; it's a roadmap designed to build momentum so that on release day, people are actually waiting to hear your track.
This visual gives you a bird's-eye view of the whole process, breaking it down into four key phases: production, visuals, distribution, and promotion.
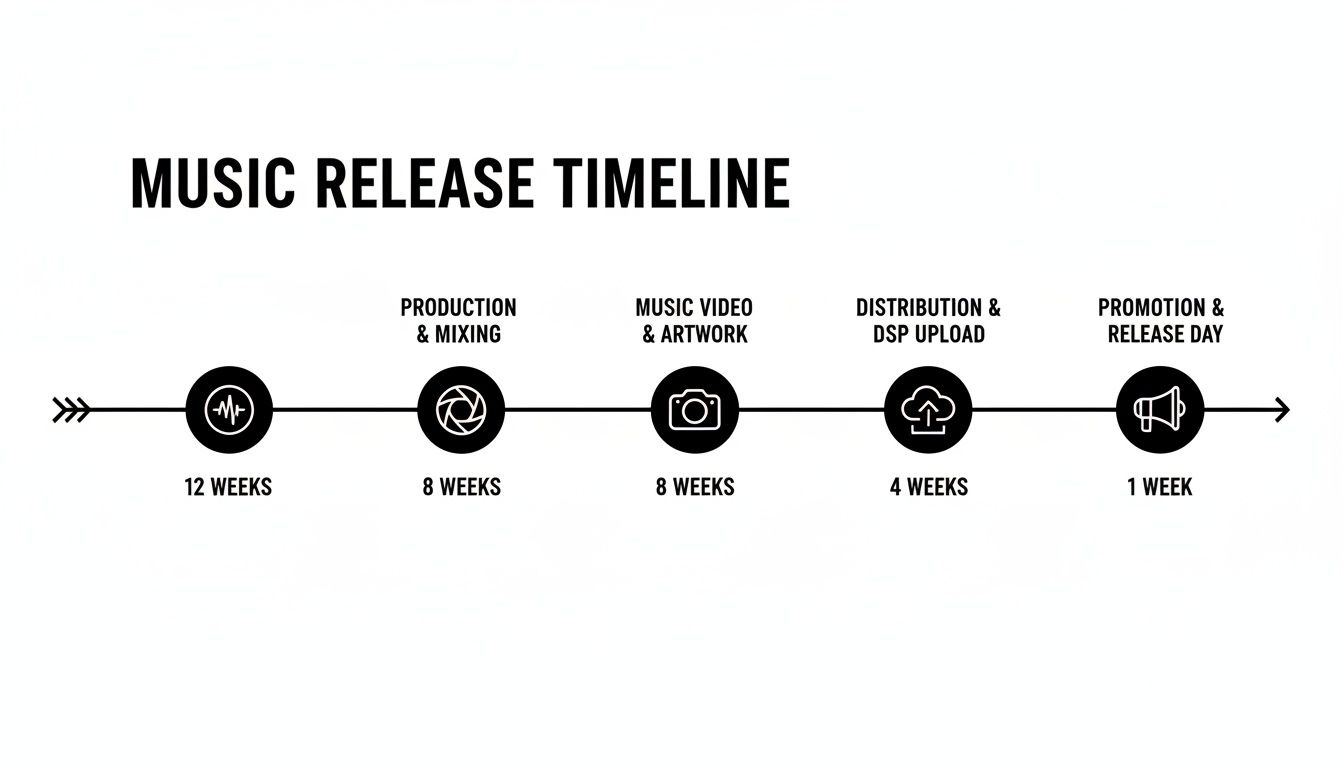
You can see how each stage builds on the last. Getting your audio and visuals sorted early on directly fuels how effective your distribution and promo efforts will be later.
To make it even clearer, here’s a quick overview of what your next three months should look like.
12-Week Independent Release Timeline At a Glance
| Timeframe | Key Actions | Primary Goal |
|---|---|---|
| Weeks 12-9 | Finalize mix, send for mastering, commission artwork. | Lock in all core assets. The song is done and sounds professional. |
| Weeks 8-5 | Receive mastered audio & artwork, shoot video/Canvas. | Build the visual identity and start warming up your audience. |
| Weeks 4-2 | Upload to distributor, submit for Spotify editorial pitching. | Secure your release date and get on the radar of playlist editors. |
| The Final Week | Aggressive social media, direct outreach, drive pre-saves. | Create a massive wave of hype leading directly into release day. |
This table maps out your entire journey. Following it prevents the last-minute scramble and ensures every piece is in place for a smooth, impactful launch.
The 12-Week Mark: Production and Planning
Alright, this is where it all begins. Three months out, your only job is to get your music and your plan locked in. The song itself needs to be 100% finished—every vocal take, every synth layer, every drum hit.
Your first move? Send that final mix to a mastering engineer. This is not optional. Mastering ensures your track is loud enough and clear enough for every streaming platform. While that's getting done, you can tackle these key tasks:
- Get Your Artwork Started: Find a graphic designer whose style you love and send them your concept for the cover.
- Nail Down Your Metadata: This is the boring but essential stuff. Collect all the songwriter splits, publisher info, and the official track title.
- Plan Your Music Video: Start brainstorming a concept. You don't have to shoot it yet, but you should know what you want to do.
The 8-Week Mark: Visuals and Pre-Promotion
By now, your mastered audio should be back in your inbox. The focus now shifts from sound to sight. This is when your cover art should be finalized, and you should be starting production on any visual content, whether that’s a full-blown music video or a simple Spotify Canvas.
This is also when you start to softly launch your promo campaign. You’re not trying to go viral yet; you’re just warming up your audience. Start teasing that new music is coming. Create a simple content calendar for the next month to keep yourself on track.
Don't overthink it at this stage. You're just planting a seed and letting your audience know that something is on the horizon. Consistency is way more important than intensity right now.
The 4-Week Mark: Distribution and Pitching
This is easily the most important technical window of the entire timeline. You absolutely must upload your mastered audio, artwork, and all that metadata to your distributor—like DistroKid or TuneCore—at least four weeks before your release date.
Why so early? One reason: Spotify playlist pitching.
Once your distributor sends your song to Spotify, it will pop up in your Spotify for Artists dashboard. From there, you have a one-time shot to pitch it directly to Spotify's editorial team for playlist consideration. That pitching window closes about a week before release, so getting it in early is crucial. Don't leave this to the last minute.
The Final Week: The Promotion Blitz
It’s go-time. In these last seven days, your mission is to be everywhere. Your social media should be firing on all cylinders with behind-the-scenes clips, the artwork reveal, and a clear call-to-action to pre-save the track.
This is also when you do the manual work. Personally email any bloggers, playlist curators, or press contacts you have. The goal here is to create a concentrated burst of noise that all points to your release day. You've worked hard for 11 weeks; don't let your music drop to silence.
Getting Your Music Ready for a Global Audience
Before anyone streams your new track, a few critical things need to happen behind the scenes. This is the nuts and bolts, the foundation of your entire release. Getting these technical details right from the start means your music sounds pro, looks legit, and is properly set up to actually make you money.
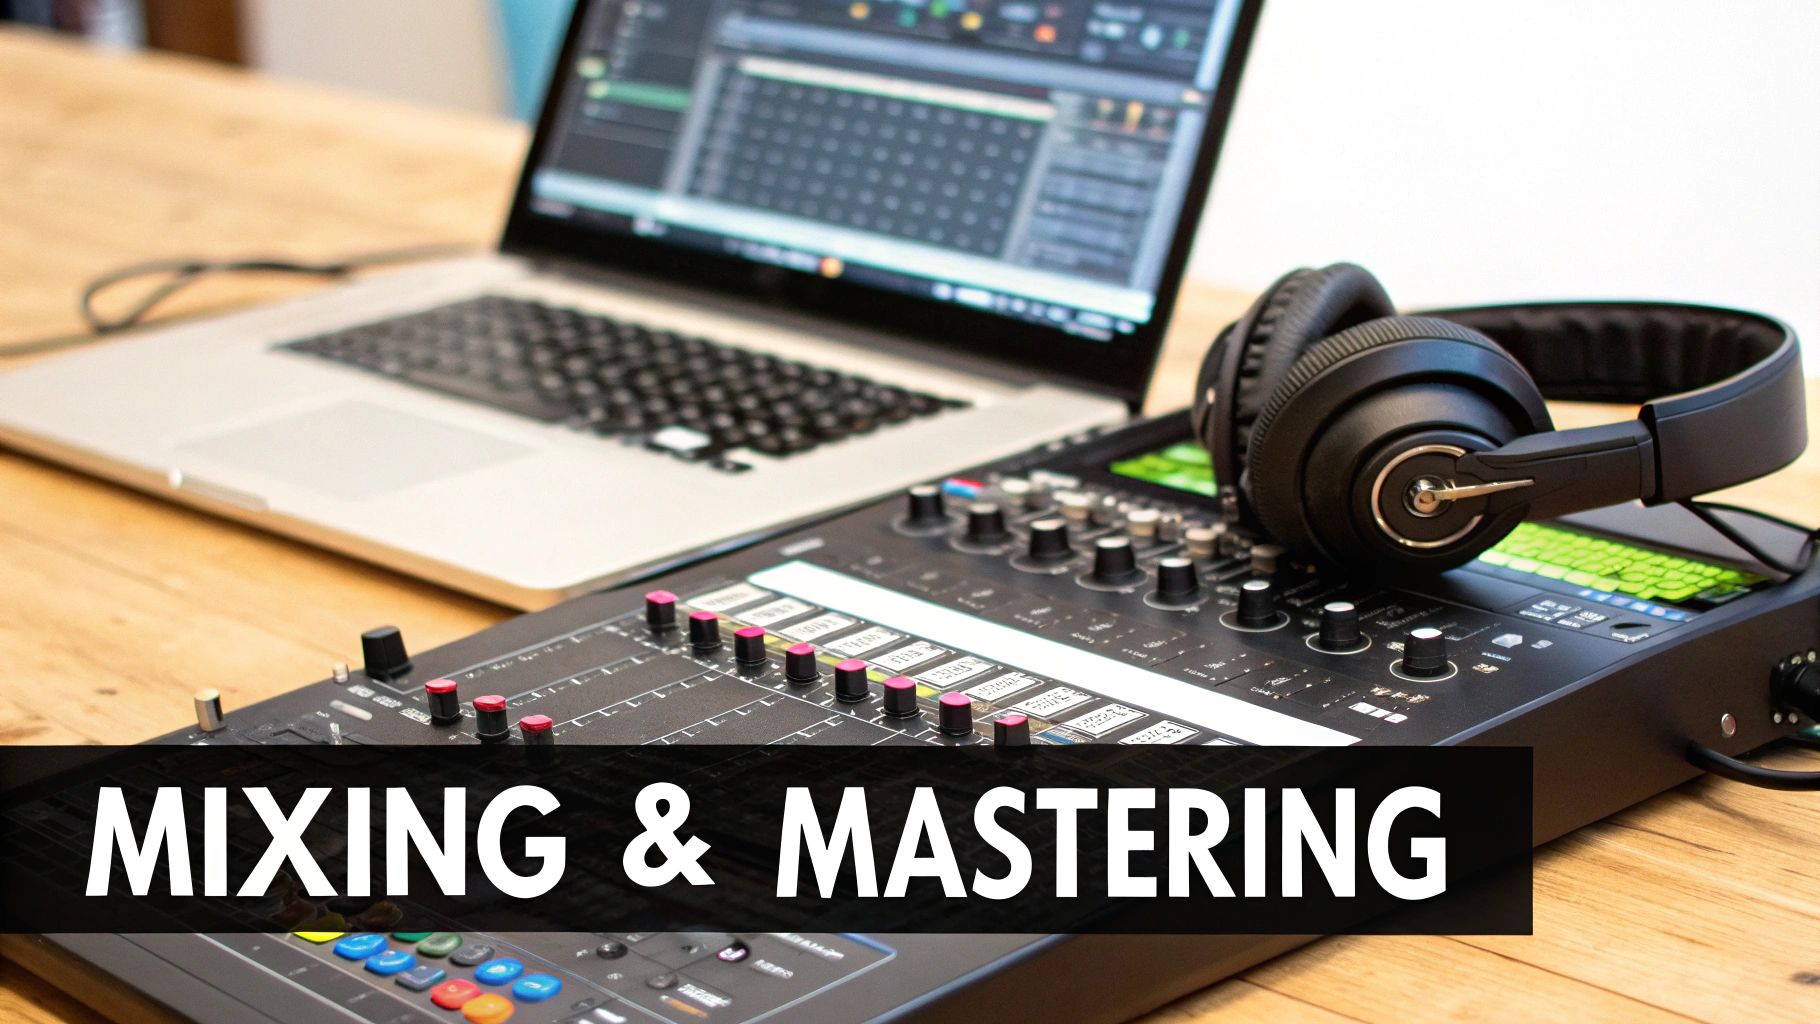
It all begins with the final sound. A raw, unmastered track just won't cut it on platforms like Spotify, where it’s competing against major label hits. Professional mixing and mastering aren’t luxuries—they’re non-negotiable for any artist who's serious about their craft.
The Polish That Makes You Competitive
Mixing is all about balancing every part of your song—the vocals, drums, bass, synths—so they sit perfectly together. Mastering is that final coat of polish, the quality control that boosts the overall volume and tonal balance to commercial standards. This is what makes your song sound massive on club speakers but also clear and crisp through AirPods.
Without it, your track will sound noticeably quieter and less powerful than everything else, and that's a surefire way to get listeners to hit "skip." Even if your budget is tight, there are tons of affordable online mastering services that deliver professional results. It's also crucial to start with a clean recording; learning to remove background noise from your audio can make a huge difference in the final product.
Your Music’s Digital Fingerprints
Once your audio is sounding perfect, you need to prep it for distribution. This means getting two critical pieces of digital ID for your music: an ISRC and a UPC.
-
ISRC (International Standard Recording Code): Think of this as a unique passport for a single recording. It never changes and is used to track every single stream and sale across all platforms, everywhere in the world.
-
UPC (Universal Product Code): This is the barcode for the entire release. If you're dropping a single, the single gets a UPC. If it’s an album, the whole album gets one UPC, while each individual track still has its own unique ISRC.
The good news? You almost never have to worry about buying these yourself. Any good digital distributor like DistroKid or TuneCore will automatically generate and assign both ISRC and UPC codes for you, usually for free, when you upload your music.
Key Takeaway: Never skip professional mastering. Your track has to meet the volume and clarity standards of major releases to even stand a chance. Your distributor will handle the ISRC and UPC codes, which are essential for tracking your music and getting paid.
Assembling Your Release Package
With the audio and codes sorted, the last piece of the puzzle is gathering all the assets and info your distributor will need. This is your "release package." Getting it right the first time prevents frustrating delays and makes you look like you know what you're doing.
First up, your cover art. It needs to be a high-quality, perfectly square image—the standard is 3000x3000 pixels. Streaming platforms are super strict about this: no website URLs, no social media handles, and no "out now" text. It just needs to be a compelling visual that captures the vibe of your music.
Next, you'll need all your metadata. This is the information that travels with your music file, and it's incredibly important for getting credited and paid correctly. Have this ready to go:
- Songwriter & Publisher Info: Who wrote the song? List every single contributor and their ownership percentage, known as "splits." This is absolutely vital for royalty collection.
- Explicit Lyrics Tag: Does your track have explicit language? Be honest. Lying here can get your release rejected or taken down.
- Genre and Sub-Genre: This helps platforms like Spotify categorize your music correctly, which is key for their algorithms and for reaching the right listeners.
Having all of this organized in a simple document before you even log in to your distributor’s website will make the entire upload process a breeze. You’ll be set up for a smooth, successful independent release from day one.
Choosing Your Distributor and Setting Up Your Release
With your final, mastered track ready to go, it's time to get it out into the world. This is where a digital distributor comes in. Think of them as the essential bridge connecting your music from your hard drive to global platforms like Spotify, Apple Music, and TIDAL. Without one, your music simply can’t reach listeners.
Picking the right partner is a massive decision. They don't just deliver your music; they're also responsible for collecting your streaming royalties, so you need to choose wisely. The indie space is dominated by a few key players, and each one has a totally different model that fits different types of artists.
Comparing the Major Music Distributors
The big three for independent artists right now are DistroKid, TuneCore, and CD Baby. They all get your music to the same digital stores, but how they charge you—and what extra features they offer—can vary a lot. Figuring out these differences is key to picking the best fit for your career.
Here's a quick look at how the most popular digital distributors stack up for indie artists.
Digital Distributor Comparison for Indie Artists
| Distributor | Pricing Model | Artist Royalty Cut | Key Features |
|---|---|---|---|
| DistroKid | Annual flat fee for unlimited uploads. | 100% | Fast uploads, pre-save links, simple interface. Great for artists who release music frequently. |
| TuneCore | Pay-per-release (single or album). | 100% | Music publishing administration add-on, robust analytics. Good for less frequent releases. |
| CD Baby | One-time fee per release + commission. | 91% (they take a 9% cut) | Physical distribution (CD/vinyl), sync licensing, comprehensive royalty collection. |
Ultimately, the right choice comes down to your release schedule and long-term goals.
For a lot of artists just starting out, DistroKid's unlimited plan offers insane value. If you're planning to drop more than one or two singles a year, the annual fee pays for itself almost immediately compared to paying for each release.
Uploading Your Release Without Errors
Once you’ve picked your distributor, it’s time to upload. This is where you need to be meticulous. Small mistakes here can cause big delays or, even worse, royalty problems later on.
Before you even log in, get all your assets organized in one folder: your mastered WAV file, your 3000x3000 pixel artwork, and all of your metadata.
As you fill out the release form, triple-check every single field. A typo in a songwriter's name or getting the ownership splits wrong can create a nightmare when it's time to get paid. Be honest about explicit lyrics, and choose the genres that actually fit your sound.
This step is also where you’ll get your ISRC and UPC codes. Your distributor will generate these for you automatically. These are basically the digital barcodes that track every stream and sale, making sure the money finds its way back to you.
Want a deeper dive into the submission process? Check out our guide on how to get your song to Spotify.
Don't Forget Your Performance Royalties
Okay, this is important. Getting your music on Spotify is only half the battle when it comes to collecting all your money. Your distributor (like DistroKid) collects your mechanical royalties—that's the money you earn from each individual stream or download.
But they don't collect your performance royalties.
These are royalties generated anytime your music is played publicly. This includes way more than you think:
- Streams on Spotify or Apple Music (yes, this generates both types!)
- Plays on traditional AM/FM radio or satellite radio
- When your song is used in a TV show, movie, or ad
- When it's played in a bar, restaurant, gym, or any public space
To collect this separate, crucial stream of income, you have to register as a songwriter with a Performing Rights Organization (PRO). In the US, the main choices are ASCAP and BMI. You can only join one, so do a little digging to see which one feels like a better home for you.
Signing up with a PRO is a one-time thing that sets up the financial plumbing you need for your career. Forgetting this step is easily one of the biggest financial mistakes indie artists make, leaving a ton of money on the table. It’s the final piece of the puzzle to make sure you get paid for every single play.
Mastering Your Spotify for Artists Strategy
Getting your music onto Spotify is a huge first step, but the real work starts now. Just having a track live on the platform isn't enough—you need to treat Spotify as your single most important marketing tool. This is where your Spotify for Artists profile becomes the command center for your entire release.
Think of it as your digital storefront. It's the first place potential fans, playlist curators, and even A&R reps will go to figure out who you are. An empty, generic profile screams "amateur." On the other hand, a polished, professional profile shows you're serious about your craft.
Claiming and Customizing Your Profile
First things first: you need to claim your artist profile. As soon as your distributor delivers your first track to Spotify, head over to the Spotify for Artists website to get verified. This gets you that little blue checkmark and unlocks all the tools you need to build out your brand.
If you need a hand with this part, this guide on how to get verified on Spotify breaks down the entire process.
Once you’re in, it’s time to make the profile feel like you. Don't gloss over these details:
- Profile Images: Get high-quality, professional photos for your header and avatar. This is your first impression, so make it a good one.
- Artist Bio: Tell a compelling story. Who are you? What drives your music? You've got 1500 characters to connect with listeners on a deeper level.
- Artist Pick: This is prime real estate. Use it to pin your new single, a playlist you're featured on, or an album you can't stop listening to. It shows you're active and keeps your profile looking fresh.
These aren't just cosmetic tweaks. They provide the context and personality that can turn a random listener into a real fan.
The Art of the Editorial Pitch
This is where knowing the ins and outs of an independent release gives you a massive edge. At least a week before your release day, your upcoming song will pop up in your Spotify for Artists dashboard. This is your one shot to pitch it directly to Spotify's editorial team.
This pitch is your direct line to the people curating huge playlists like New Music Friday and Fresh Finds. Getting a placement on one of these can completely change a song's trajectory, putting it in front of hundreds of thousands of new ears overnight.
Your pitch needs to be short, personal, and packed with info. When you fill out the form, nail these sections:
- Genre & Mood: Get specific. Don't just say "Pop." Think "Dream Pop," "Synthwave," or "Melancholic." The more precise you are, the better Spotify's algorithm and editors can understand where your track belongs.
- The Story: This is your chance to stand out. Give them a hook. Briefly explain what the song is about, the story behind its creation, or any unique gear you used.
Pro Tip: Keep your pitch passionate and personal, not technical. An editor is way more likely to connect with a story about writing a song for your hometown than a dry description of its BPM and key.
Engaging Listeners with Spotify Canvas
Finally, don’t sleep on Spotify Canvas. These short, looping videos that play behind your track are an absolute game-changer for engagement. Spotify's own data shows that tracks with a Canvas see a big lift in shares, saves, and playlist adds.
You don't need a Hollywood budget for this. A Canvas can be a simple visual loop from your music video, a cool abstract animation, or even a behind-the-scenes phone clip. The goal is simple: create something visually interesting that captures the song's vibe and makes your music a full-on experience.
Building Hype With a Pre-Release Promotion Plan
Your release's success is often decided weeks before it ever hits streaming platforms. Seriously. The work you put in beforehand—building genuine anticipation—is what separates a silent drop from a massive launch. This is where you switch from being a creator to a marketer and start building a real groundswell of excitement.
A powerful pre-release plan isn't about spamming "out soon" on your socials. It's about crafting a compelling narrative around your music and actually inviting your audience into that story.
Start by figuring out the core message of your track. What’s the vibe? What inspired it? This story becomes the raw material for every single piece of promotional content you create. Once you have that, get organized with a content calendar. It sounds simple, but it will keep your promotion consistent and save you from the last-minute panic of not knowing what to post.
Crafting Your Social Media Blitz
Social media, especially short-form video on TikTok and Instagram, is your most powerful free marketing tool. No question. The goal isn't just to announce your music; it's to make people feel like they're a part of the journey.
Start teasing your track 2-3 weeks before release day. Don't just post the cover art and call it a day—create a variety of content that pulls back the curtain on your creative process.
- Behind-the-scenes clips: Share snippets from the studio session where you recorded vocals or a quick video of you tweaking the final mix.
- Lyric snippets: Post a striking line from the song over a moody visual to spark some curiosity.
- Jump on a trend: Find trending audio or a format on TikTok and connect it back to the theme of your new song.
- The "Hook" reveal: Post a video of the most infectious part of your song—the chorus or a catchy riff—and ask your followers what they think.
To maximize your reach and keep a consistent presence without burning out, many independent artists use social media automation tools to streamline their pre-release plan. This helps make sure your content goes live at the best times, even if you can't be online 24/7.
The Power of Direct Connection
While social media is great for casting a wide net, your email list is where your core supporters live. These are the fans most likely to pre-save, share, and buy your music. It's a direct, unfiltered line of communication that you own, free from the whims of algorithms.
A couple of weeks out, send an email announcing the new music and release date. Share a more personal story about the song's creation than you would on social media. Most importantly, drive them to a pre-save link. Pre-saves are a crucial signal to Spotify's algorithm that your track has momentum before it even drops. For a deeper dive, check out our guide on how to pre-save on Spotify.
Key Insight: Your email list isn't just for announcements. Use it to offer exclusive content, like early access to a music video premiere or a discount on new merch. This rewards your most dedicated fans and makes that direct connection even stronger.
Reaching Beyond Your Own Audience
Now it’s time to get your music in front of fresh ears. This means targeting music blogs and independent playlist curators. You need to start this outreach at least 3-4 weeks before your release to give them enough time to listen and schedule any features.
Put together a concise and professional electronic press kit (EPK) with your bio, promo photos, artwork, and a private streaming link to the track. When you reach out, personalize every single email. Mention a recent article they wrote or a playlist of theirs you genuinely like. It shows you’ve done your homework and aren't just blasting a generic template to hundreds of contacts.
This multi-channel approach—social media for broad hype, email for your core fans, and PR for new audiences—creates a powerful echo chamber of excitement. The rise of independent artists has proven that this kind of grassroots marketing is more effective than ever. In 2025, over 50% of all music streamed globally comes from independent artists, a massive shift powered by smart digital strategy.
With streaming revenues exceeding $20 billion in 2024 and 65% of listeners discovering new indie music through social media and algorithms, your pre-release plan is your ticket to joining this new majority. By the time release day arrives, you won't be launching to an empty room; you'll be dropping your music to an audience that's been waiting for it.
Common Questions About Releasing Music Independently
Jumping into an independent release for the first time is a magnet for questions. Getting clear answers can be the difference between a smooth launch and a total headache. Let's cut through the noise and tackle the big questions so you can get back to the music.

So many artists ask about the exact timing for getting their tracks uploaded. Honestly, messing this up is one of the easiest ways to sabotage your own release before it even gets a chance.
How Far in Advance Should I Upload My Music to a Distributor?
The sweet spot is four to six weeks before your release date. This isn't just a friendly suggestion—it’s a non-negotiable part of a serious release strategy.
Why so early? A few critical reasons. First, it gives your distributor more than enough time to get your music processed and delivered to all the DSPs (Spotify, Apple Music, etc.). Sometimes things get stuck in the pipeline, and this buffer prevents a minor technical glitch from turning into a full-blown crisis.
But the real game-changer is this: uploading early is your ticket to pitching Spotify's editorial playlists. Once your track is in their system, it pops up in your Spotify for Artists dashboard, ready for you to pitch. Since that pitching window usually closes a week before release, this lead time lets you craft a killer pitch instead of scrambling at the last minute. Don't make that rookie mistake.
Do I Really Need ISRC and UPC Codes?
Yes, you absolutely do. No debate here. Think of them as the digital DNA for your music. They allow every single play and sale to be tracked across the globe. Without them, you're just not going to get paid properly.
Here’s the simple breakdown:
- UPC (Universal Product Code): This is the barcode for your entire release. One single gets one UPC. A five-track EP gets one UPC.
- ISRC (International Standard Recording Code): This is a unique code for each individual track. That five-track EP would have one UPC for the project but five separate ISRCs, one for each song.
The good news? You almost never have to worry about buying these yourself. Any good distributor like DistroKid or TuneCore will generate and assign them to your release for free. It’s all part of the service.
Key Takeaway: Your distributor and your PRO are two different but equally critical partners. The distributor gets your music to the stores and collects streaming royalties, while the PRO collects public performance royalties. You need both to maximize your earnings.
What Is the Difference Between a Distributor and a PRO?
This one trips up a lot of artists, but it's vital for making sure you're collecting all the money you've earned. They handle two totally different types of royalties.
Your music distributor (like TuneCore or CD Baby) is your pipeline to the world. You pay them, and they push your music out to hundreds of platforms. They then collect the "mechanical royalties" from streams and sales and pass them on to you.
A Performing Rights Organization, or PRO (like ASCAP or BMI in the US), is different. They collect "performance royalties." These are royalties generated anytime your music is played publicly—this includes Spotify streams, but also radio spins, TV placements, or even if it's playing in the background at a cafe.
To get paid everything you're owed, you need to be signed up with both. Your distributor won’t collect your performance royalties, and your PRO won’t get your music onto Spotify. They're two essential pieces of the same puzzle.
Ready to get your music heard by a global audience? At Club Restricted Promo, we specialize in taking your release to the next level with targeted Spotify growth campaigns, playlist pitching, and social media amplification. Stop hoping for streams and start building a real career.
Explore our promotion packages and launch your next hit today!